Gold Painted Pumpkins For The Fall Season
This post may contain affiliate links. As an Amazon Associate I earn from qualifying purchases.

These DIY-painted pumpkins are easy to make and only take about 30 minutes from start to finish. In no time, your fall decor will be as good as gold!
I love fall – it is one of my favorite times of the year! There are so many home decor projects out there, but nothing makes my heart happier than faux pumpkins.
If you’re ready to make a statement with your decor this season, make these adorable gold leaf pumpkins. They are so simple and will add the perfect touch to your home this fall!
To make your very own painted pumpkins, all you need are a few basic supplies, 30 minutes of time, and you’re golden! (haha)
They are a totally versatile piece of decor that can be displayed anywhere you want. Plus, since this project uses faux craft pumpkins (as opposed to fresh), they won’t rot. Bonus!
Where To Display Painted Pumpkins
There are basically no limits to where you can add painted pumpkin decor. Here are a few ideas and places you can show off your gold pumpkins:
- Home Office – Set them on your desk or bookshelf for seasonal fun.
- Mantle – Add assorted sizes of painted pumpkins along your mantlepiece.
- Porch – Place large faux pumpkins on your front porch.
- Kitchen – Set them up on your countertop with your fall decor.
- Bathroom – Create a little pumpkin corner on your bathroom vanity.
- Entryway – Display them on a narrow table at the entry of your home.
These literally fit in every single room of your home. Wherever you normally set up fall decor, you can place these pumpkins.
However, these DIY pumpkins may even inspire you to find new areas to decorate your home for the season!
Painted Pumpkins – The Easy Pumpkin Craft
Let me tell you… painting pumpkins is so much more fun (and rewarding) than carving them. Carving pumpkins is super festive – but it is a hassle. Painting them feels just as fall-ish, without the mess.
Right now, I am loving white and gold pumpkins – they go with all the rest of my gold decor. (I think I’m just a huge fan of all things gold, including rose gold).
In this tutorial, I’ll show you how easy it is to paint your own mini pumpkins. This is a great project that you can do with kids, with your girlfriends, or just by yourself as a way to relax!
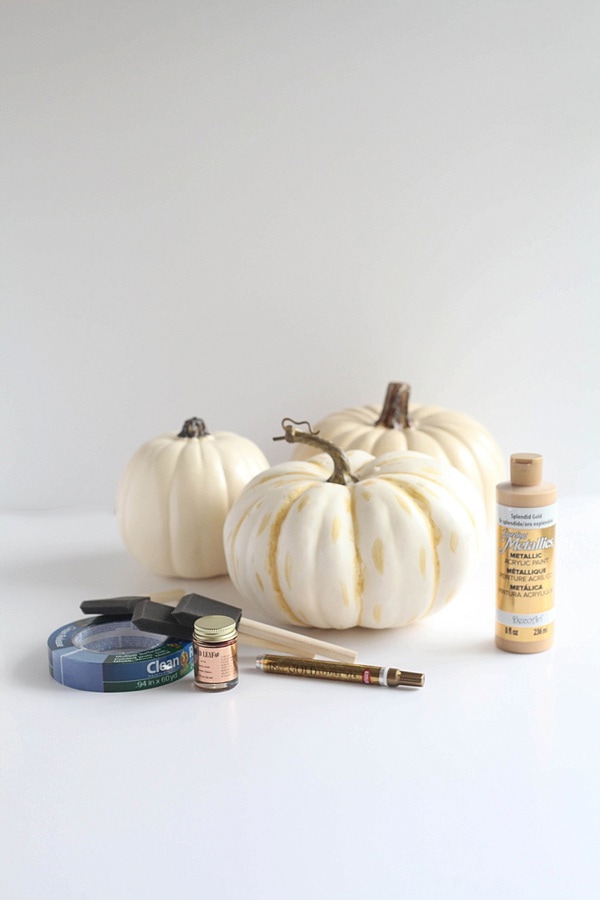
Supplies Needed For Gold Leaf Pumpkins
Before you get started, round up your supplies. They can be found at your neighborhood craft store for under $10 each normally. Or, I’ve linked the products I used below.
Here’s what you’ll need:
- Craft pumpkins
- Foam brushes
- Painter’s tape
- Gold metallic acrylic paint
- Gold leaf pen
- Liquid gold leaf
Best Paint For Pumpkins
I used regular craft acrylic paint on the pumpkins, and the results were not nearly as crisp and beautiful as I wanted. That’s why I suggest you use a gold leaf pen and liquid gold leaf on the pumpkins.
The gold leaf gives the pumpkins a crisp and prettier look at the end.
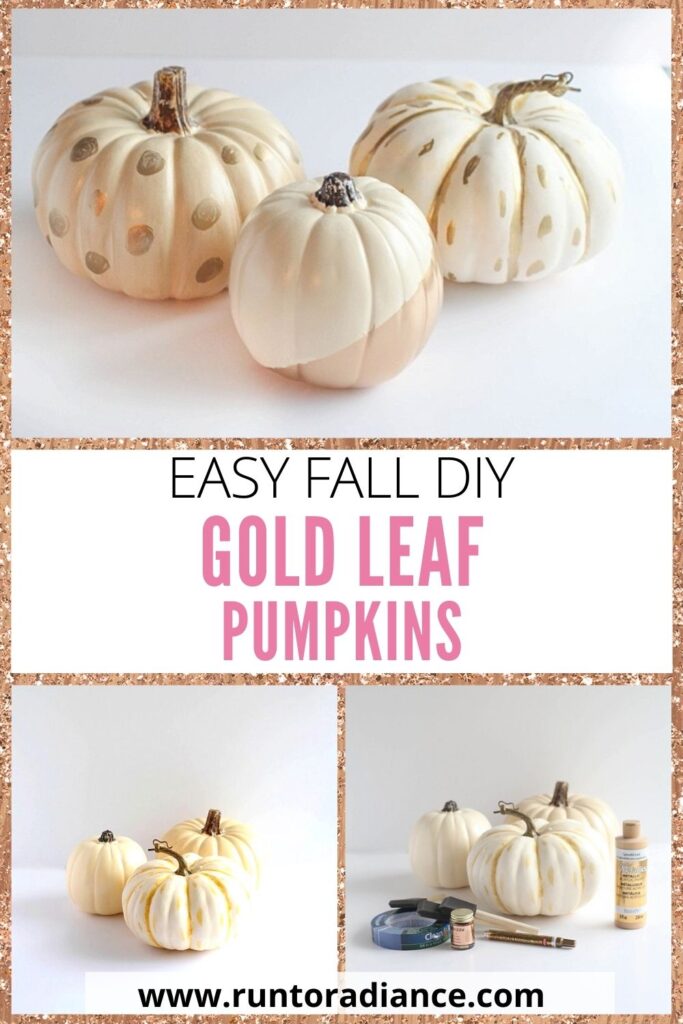
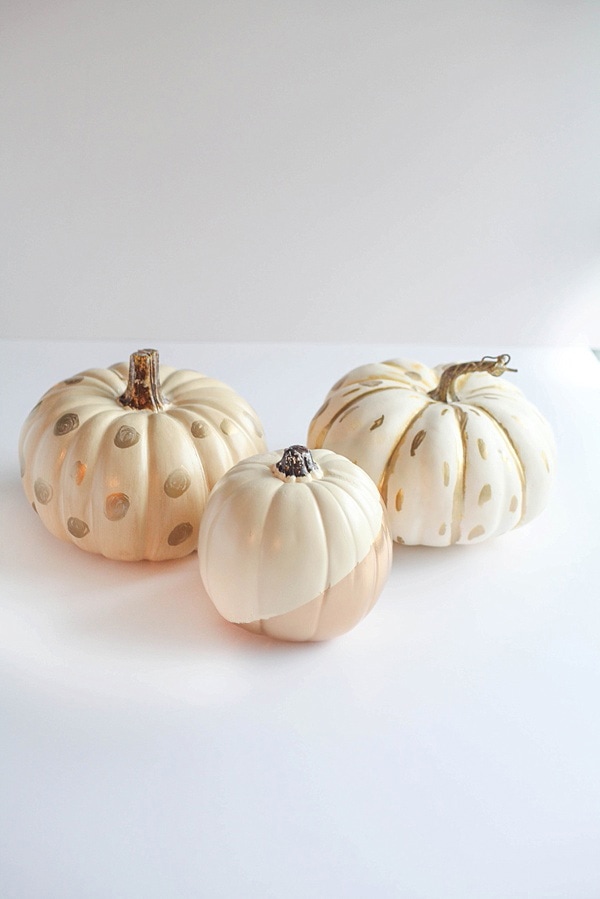
How To Paint Faux Pumpkins (3 Ways)
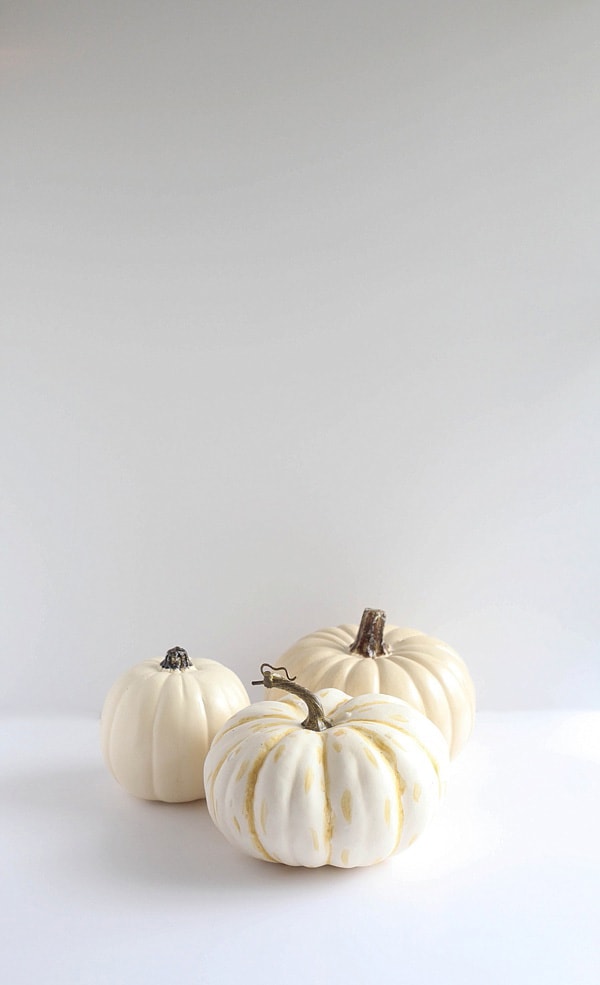
We made three different kinds of painted pumpkins, and they all turned out beautiful in their own way. Feel free to copy my ideas or create your own patterns and designs. That’s the fun of crafting!
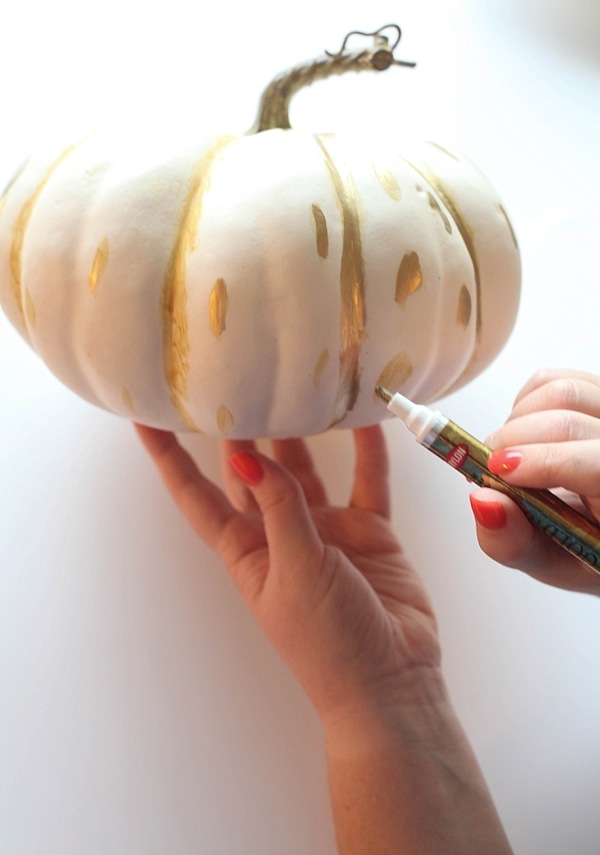
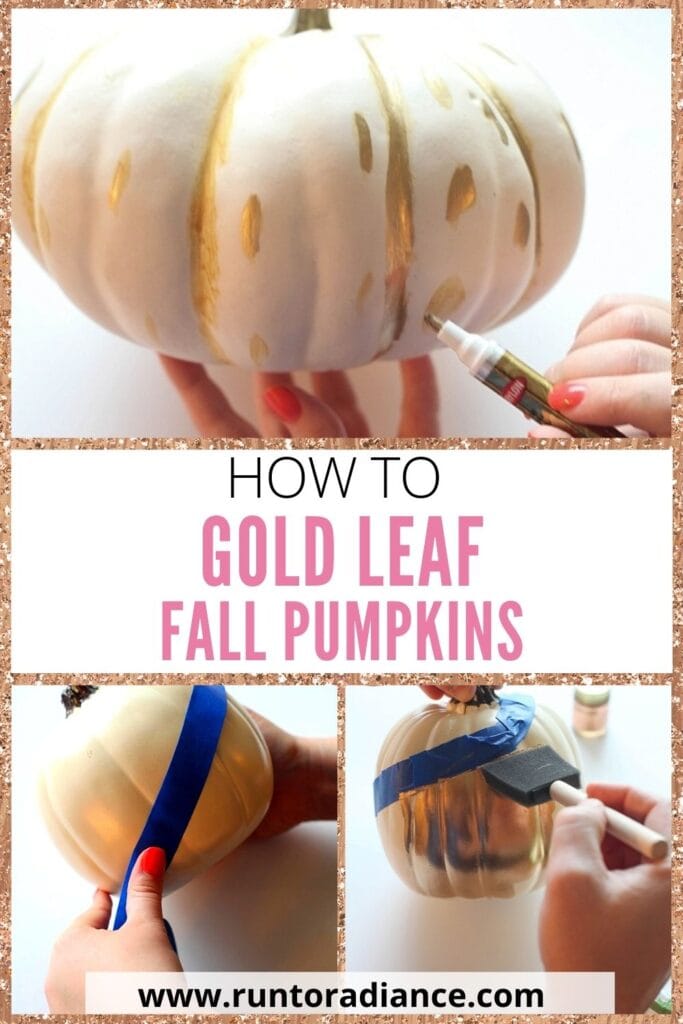
1. Stripes And Polka Dots
For the first pumpkin, I did a combination of stripes and dots. The gold leaf pen made this process super fast. It also allowed me to be intentional about where I placed my dots.
You could use a foam brush and paint to create the stripes if you want.
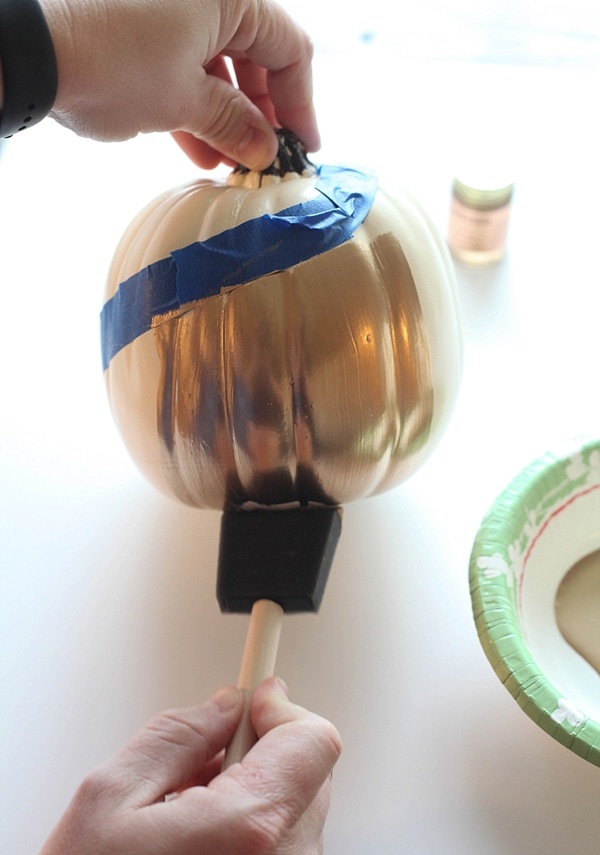
2. Diagonal Pattern
For the second pumpkin, we used painter’s tape to create a diagonal stripe. Below the tape on the bottom half, we used a foam brush and liquid gold leaf to paint the pumpkin.
Let it dry completely before you remove the painter’s tape.
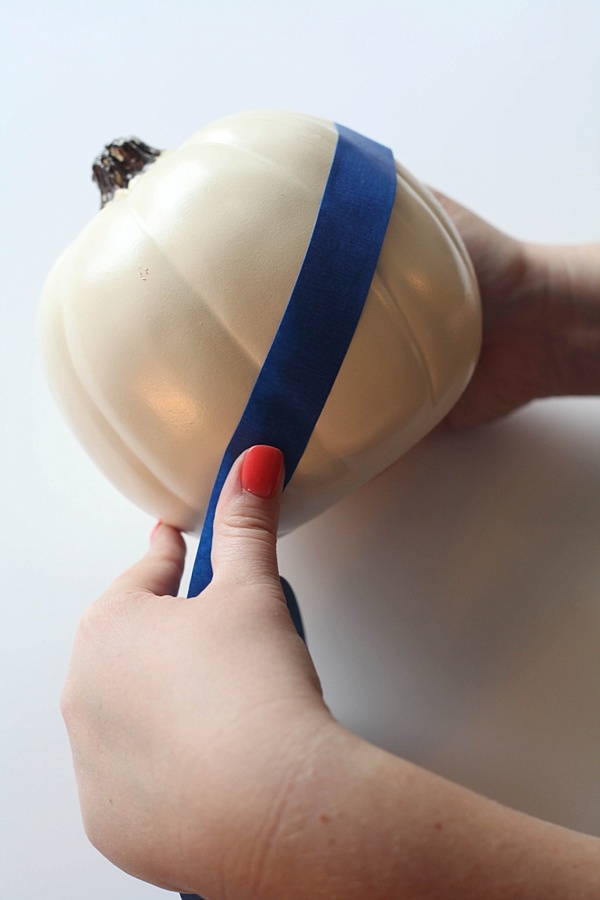
I suggest painting the bottom half of the pumpkin because you can hold onto the stem as you paint it. This way, you’re not smudging the paint or getting your hands messy.
Remember to use even vertical strokes as you paint – it will create a smooth appearance as it dries.
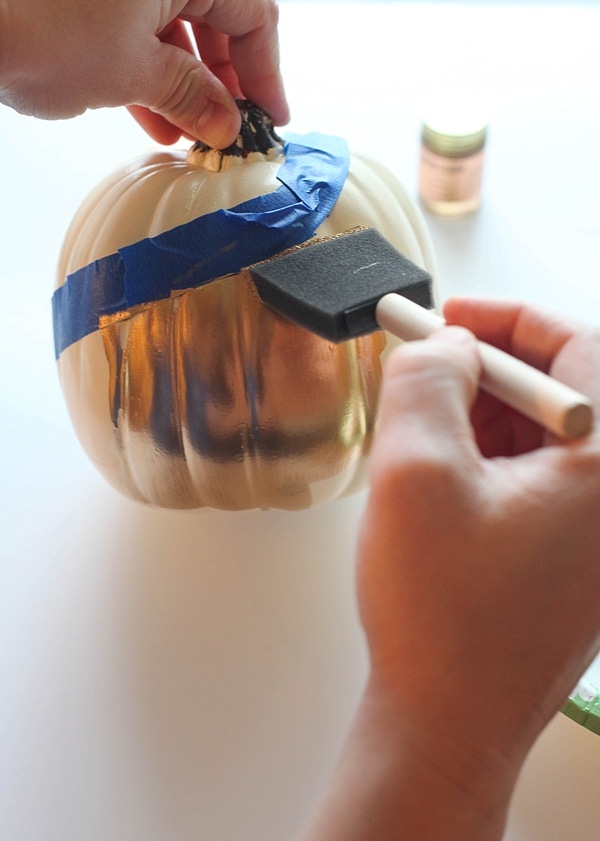
I think this was my favorite way to paint a pumpkin out of the whole group! I really like how shiny the liquid gold leaf is! It really pops on the pumpkin.
The gold and white pumpkins look elegant on my front porch. I also set a few of them on my desk in my office to give it a touch of fall!
Have leftover liquid gold leaf? Use it to make these adorable DIY wishbones! They are perfect for your Thanksgiving table.
3. Polka Dots
For the last pumpkin, I just used the gold leaf pen to draw some polka dots all over the pumpkin.
For this one, I can see using the acrylic paint and just using a foam stamp in the paint and then stamping circles on the pumpkin.
Faux Pumpkin Decor
After your pumpkins have dried, you’ll have the most blingy pumpkins on the block! As good as gold, right?
Gather your friends together and paint these super festive pumpkins together.
This is pretty much the best girl’s night craft project you can do. Fun drinks, gold paint, and pumpkins – a pretty dreamy combination, don’t you think?
More Pumpkin Painting Ideas
The best thing about this fall craft project is that you can make any number of changes to match the pumpkins to your home and aesthetic.
Try using different paints, stencils, or textures to change your faux pumpkin’s look and feel completely!
Here are a few more pumpkin painting ideas you should try:
- All Black – Cover your pumpkins in black paint for a dark, gothic look. This looks amazing with gold accents, too!
- Hand-Lettering – Either freestyle with your hands or attach vinyl letters from a Cricut.
- Chevron – This is actually a really easy pattern to do, especially with painter’s tape.
- Team Colors – Show your pride by painting pumpkins in your team’s colors!
- Paint Pouring – Pour a rainbow of colors on the pumpkins and let the paint drip down. It creates such a fun and colorful fall decor.
- Emoji – Cover your pumpkins in yellow paint and then use black and red to create different emoji faces on the front.
- Donut Pumpkin – Paint your pumpkin pink, and then use paint markers to draw purple and blue “sprinkles” all over it. This makes it look like a frosted donut.
Give Painted Pumpkins As DIY Gifts
These pumpkins make the perfect hostess or house-warming gift. You can even personalize the pumpkins with their monogram for an extra-thoughtful touch.
DIY gifts mean so much more than others because it shows you cared enough to spend time creating it just for them.
Well, that’s it! Now, you can make your own painted pumpkins in no time! Show me your final product if you do – I’d love to see your creations!
More Fall DIYs You’ll Love
Pin this post so you can find it later, and definitely share it with your friends too.

Love your pumpkins!!! White and gold are always so classy and perfect 🙂
Just so cute! Love the gold!
How cute and classy these turned out – I’d love to do these next year and display them inside, thanks for sharing! Pinned!
I’m so into gold and metallic this season, these pumpkin turned out beautifully – absolutely gorgeous! Very easy craft and such a great transformation!
Wow! They are perfect for the Thanksgiving table. I love them. Thanks for sharing.
hello to the classiest way to display pumpkins! pinning this as wedding decor ideas 😀
This is so cute! I plan to try this with some pumpkins this year!