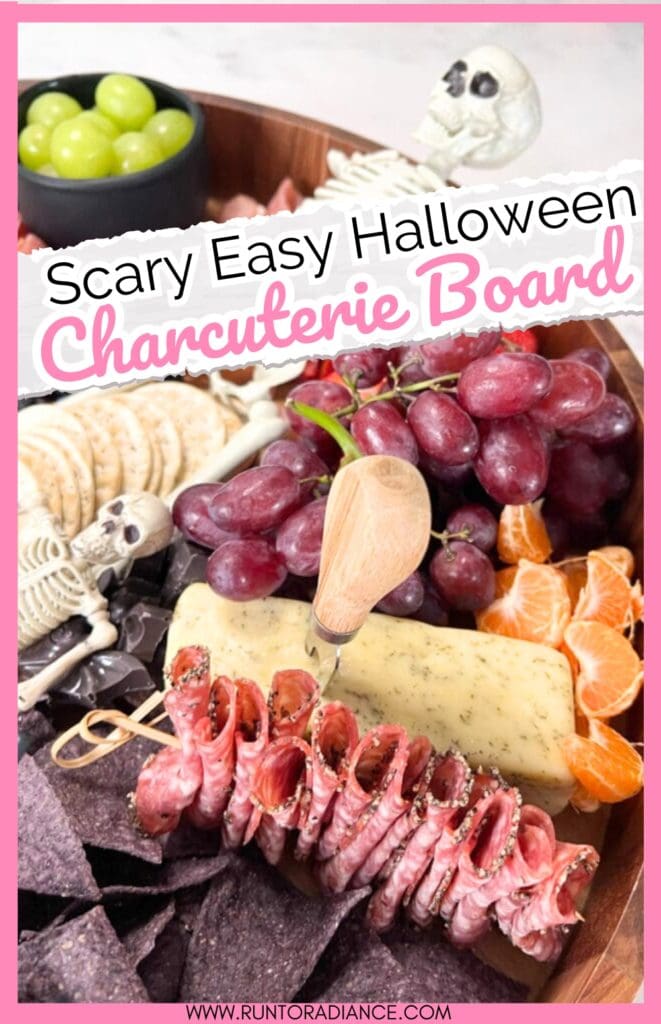
Build the Perfect Spooky Halloween Charcuterie Board
This post may contain affiliate links. As an Amazon Associate I earn from qualifying purchases.

To help you craft the perfect board, I’m sharing the ten must-have elements for the ultimate Halloween charcuterie. Just follow this simple formula, and I promise you, anyone can make (and devour!) this yummy appetizer!
Are you looking for a show-stopping centerpiece to make your Halloween festivities extra spooktacular? Look no further than a fun Halloween charcuterie board!
Whether you are having a family movie night or hosting a spooky celebration, a well-crafted charcuterie board can easily become the centerpiece of your gathering.
Not only are grazing boards super easy to make, but they look awesome and can easily feed a crowd.
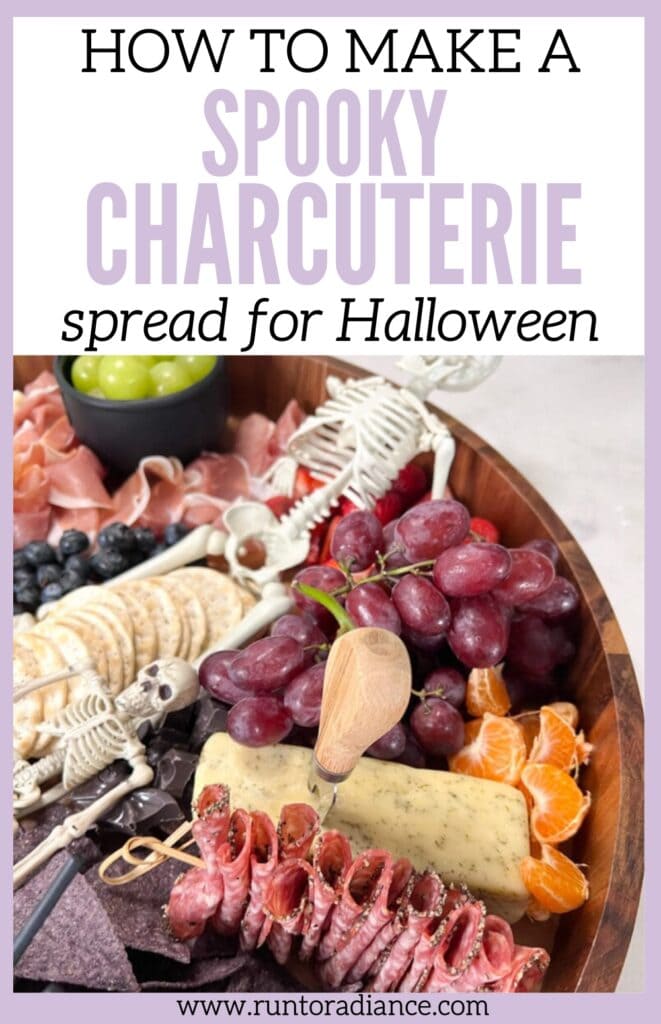
To help you craft the perfect board, I’m sharing my 10 must-have elements for the perfect Halloween charcuterie. Just follow this simple formula, and I promise you, anyone can make (and devour!) this yummy appetizer!
Here’s why you’ll love making this skeleton Halloween charcuterie board
Watch the video
Here’s visual proof of just how easy it is to build a skeleton charcuterie board in minutes!
Psst…want to make a sweet board instead? Check out this ultimate candy charcuterie board, perfect for Halloween!
10 Must-have elements of the perfect Halloween charcuterie board
Ready to dive in and make a board of your own? I have made dozens, if not hundreds, of charcuterie boards over the years, and I have it down to a science at this point.
Here are the things I recommend you have on every board!
1. Somewhere to put the food
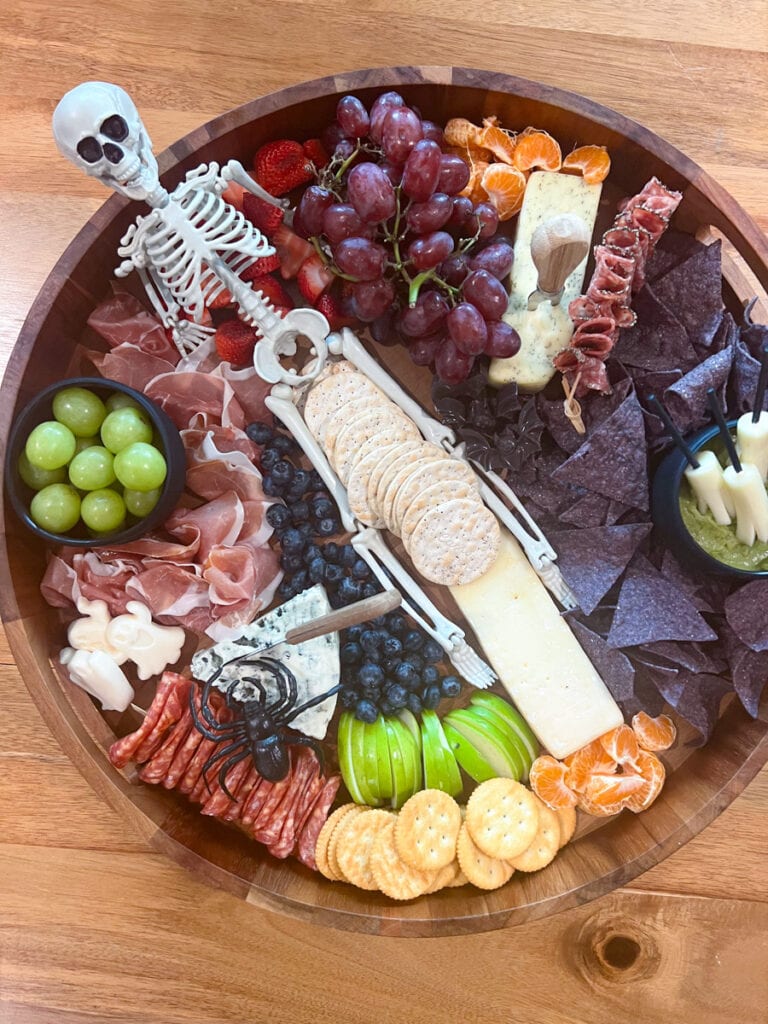
Okay, this one is a little obvious, but what you can fit on your board is limited by how big your board actually is! You can use a wooden cutting board, serving platter, bamboo serving trays, or even a large round serving tray (like I did!) as the base for your Halloween charcuterie.
If you are feeding a large crowd, you can simply roll out a long piece of parchment paper and place the elements directly on it.
Of course, you can grab a board that has Halloween flair to it, like this cute pumpkin-shaped board (it would work great for Thanksgiving, too!).
Whichever board you choose, I have found that having a lip on the edge as opposed to a flat board keeps ingredients corralled better (especially with kids!). Just make sure it’s food-safe and has enough space for all your delicious treats.

2. Cheese, please
Now that you have your board or base picked out, it’s time to start adding the elements! Cheese is a must-have on any charcuterie board. It adds delicious flavor and texture to your bites.
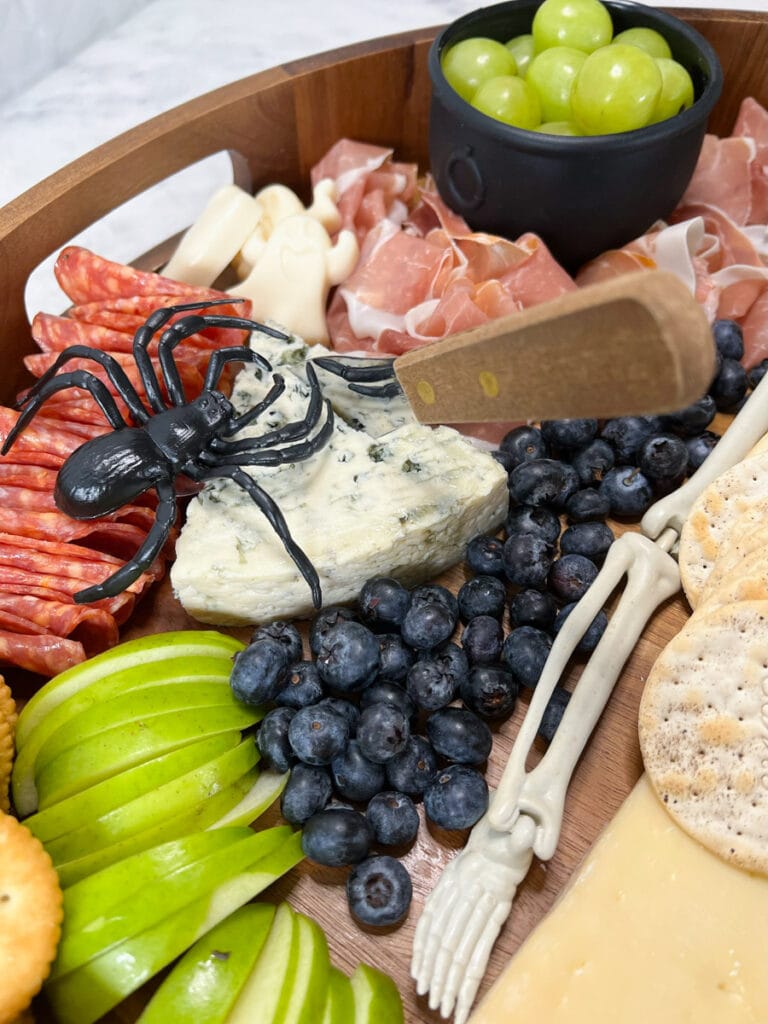
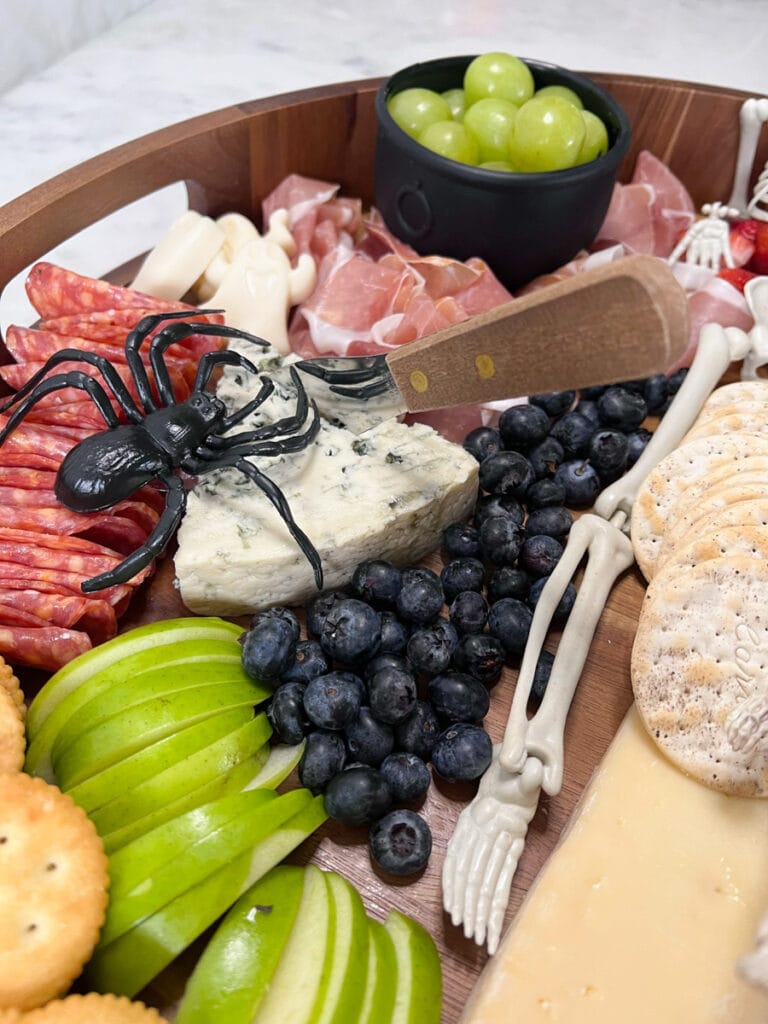
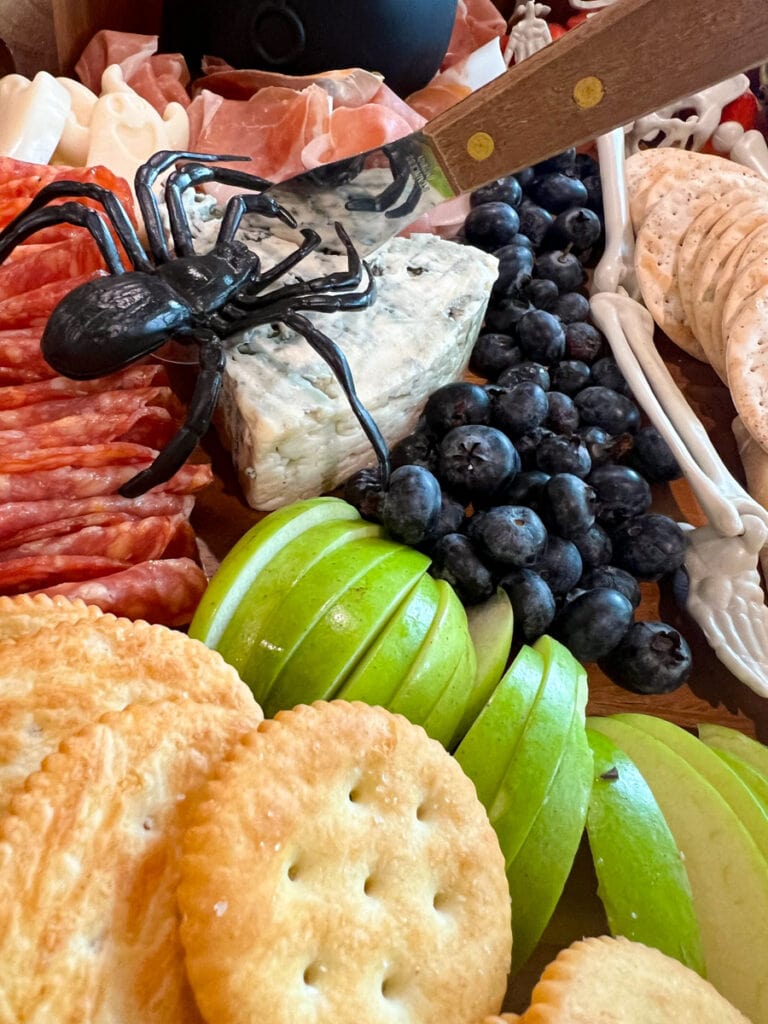
For a Halloween twist, I recommend choosing cheeses that look “spooky”. Blue cheese is a great option, although most kids may not be a fan! You’ll want a variety of cheeses in different textures, such as:
- A soft cheese like brie, blue cheese, mozzarella balls, or goat cheese. These are great to spread on crackers or bread.
- Semi-soft cheeses: Gouda, Havarti, and fontina are all excellent choices.
- Firm cheese like cheddar, gruyere, or manchego. These can be easily sliced and eaten on their own or paired in bites with meats and fruits.
- A hard cheese like parmesan or asiago. These add a nice salty kick to your board!
I have found the best value and an excellent selection of cheeses at Trader Joe’s. Whole Foods and Central Market also have a very nice selection, but cost quite a bit more! Cheese can get expensive quickly, so choose wisely here!
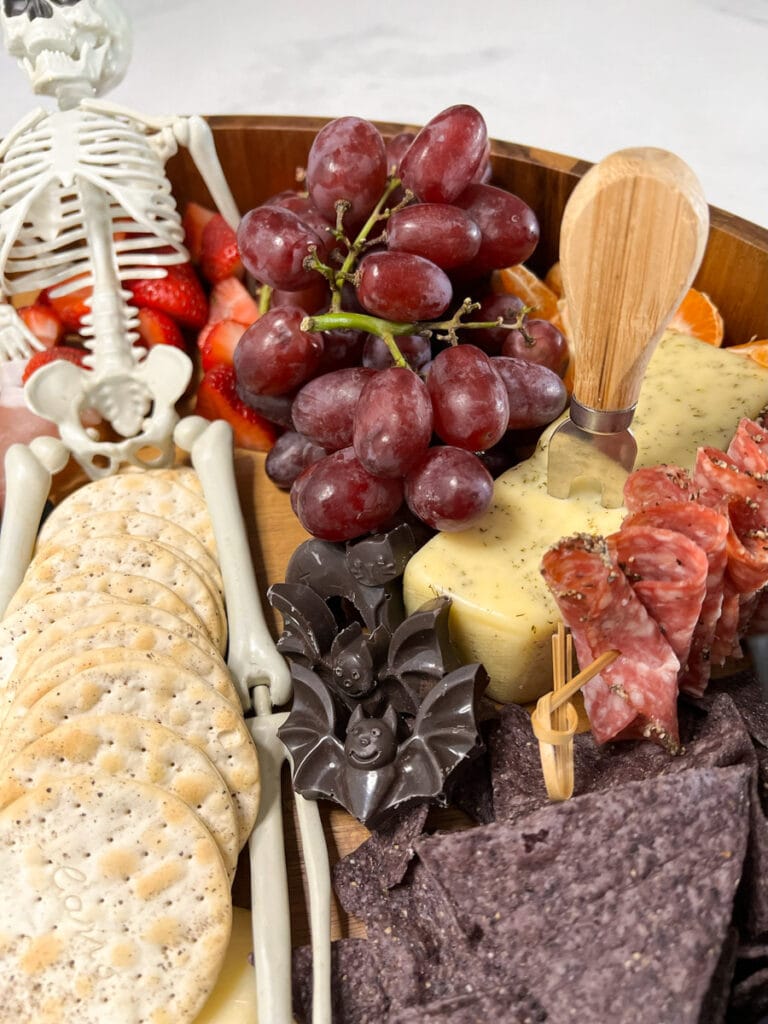
3. Variety of meats
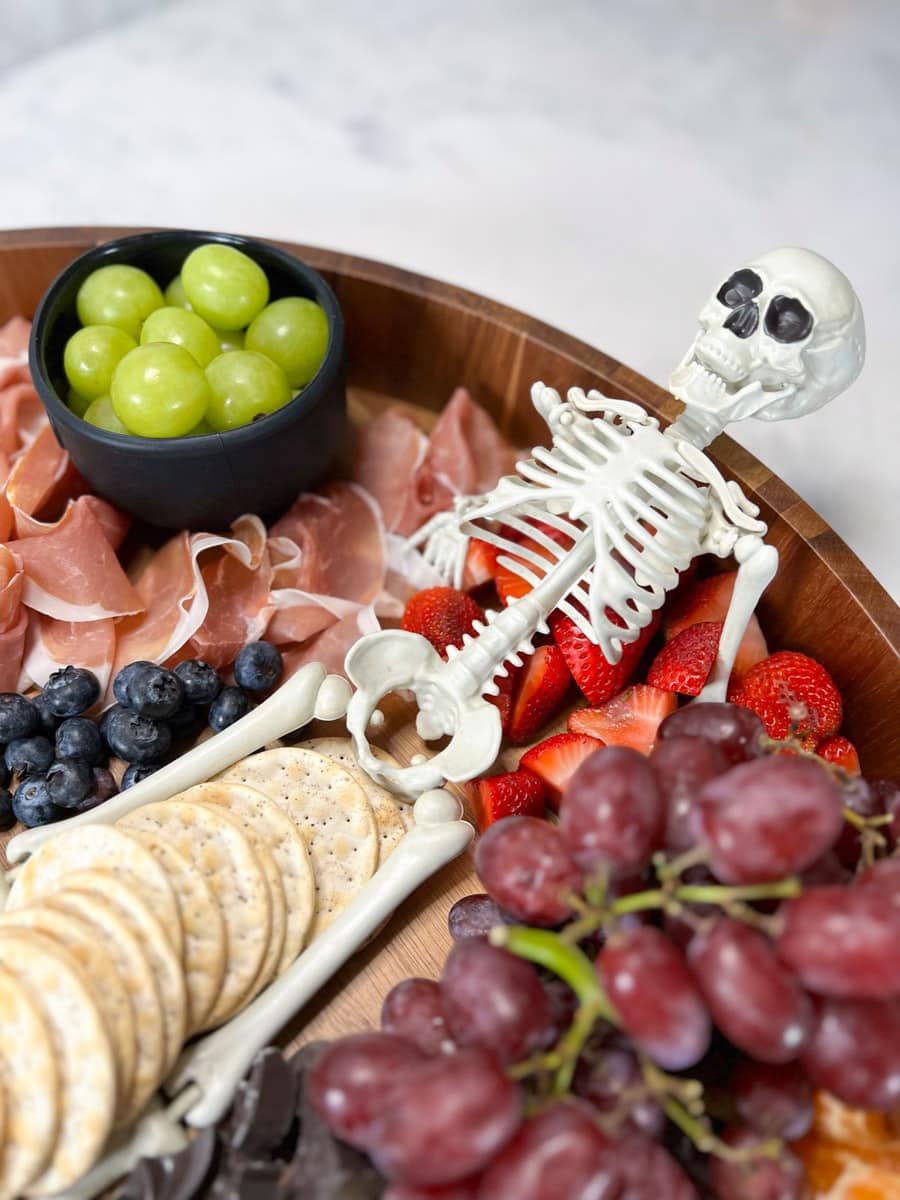
No Halloween snack board is complete without an assortment of cured meats. Sliced deli meats like salami, prosciutto, and pepperoni are classics for a reason – they taste great with cheese!
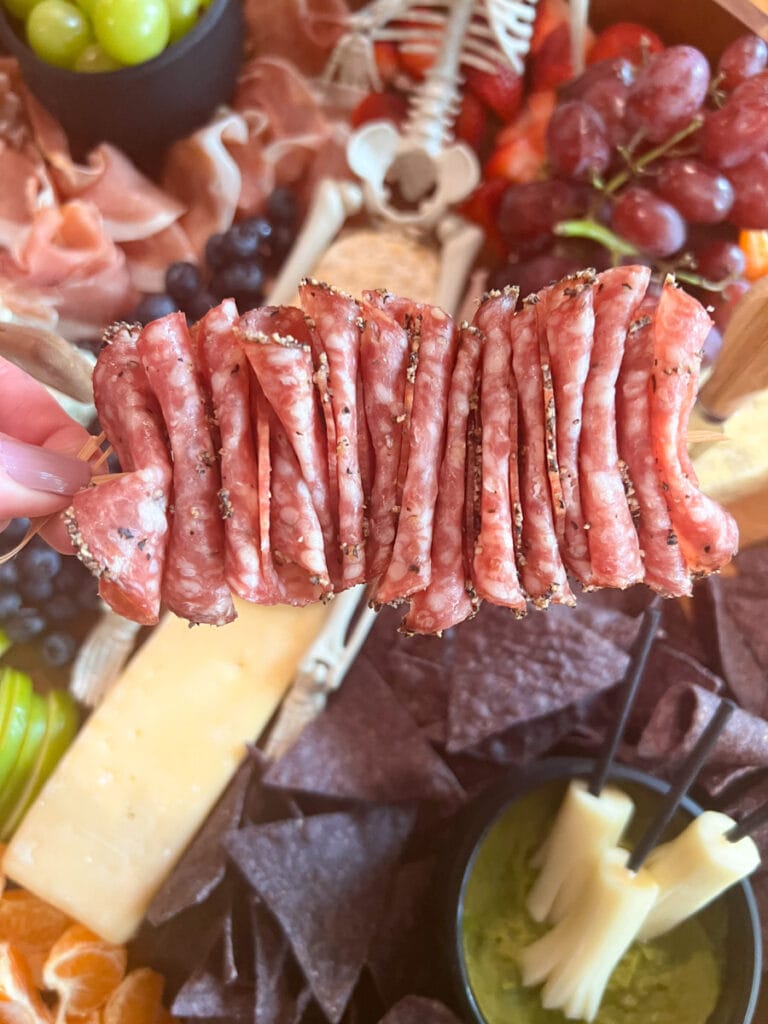
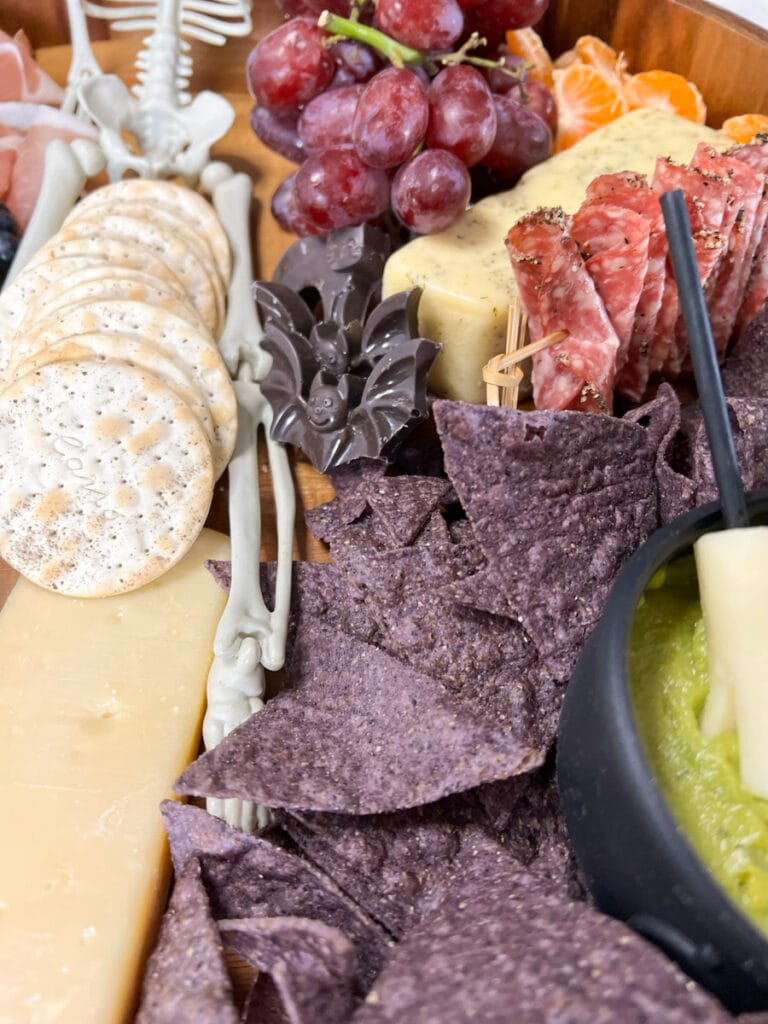
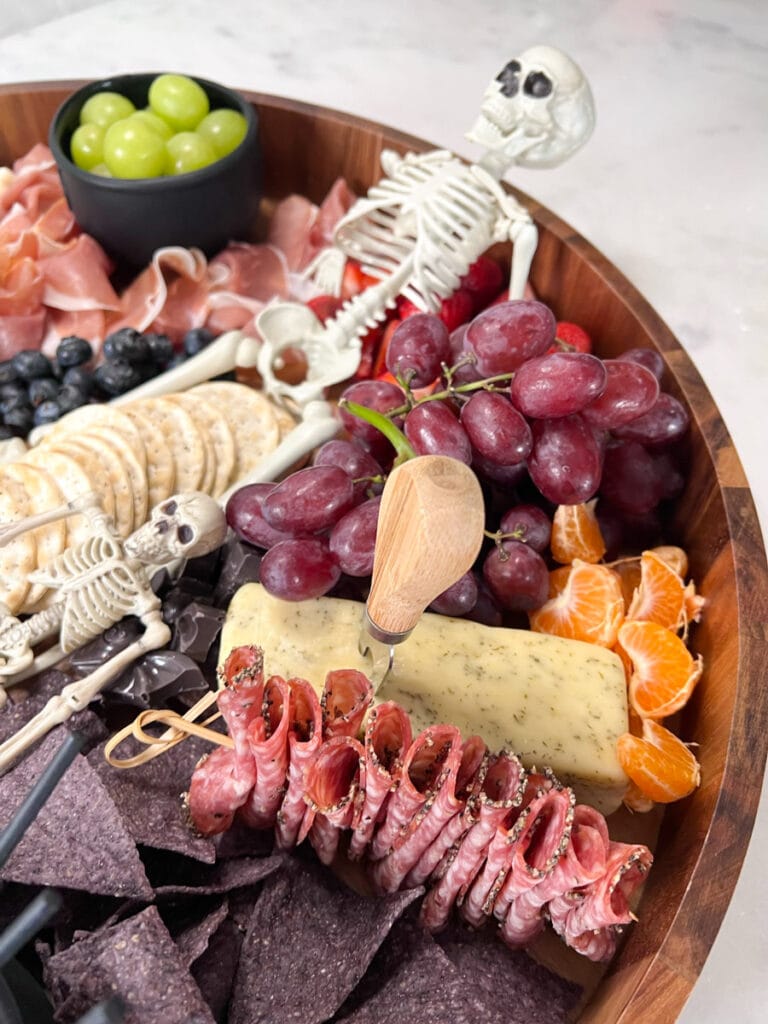
For a Halloween twist and to keep things looking visually pretty, I used skewers for the salami. I wouldn’t recommend this for kids!
The prosciutto was simply pinched and put in a pretty pattern around the board.
4. Dip or sauce
While not an essential component, a dip or sauce can add another layer of flavor to your charcuterie board. Some great options include:
- Honey – pairs well with soft cheeses and fruits.
- Mustard – adds a tangy kick to meats and cheese.
- Caramel or chocolate sauce – perfect for dipping fruit slices in or drizzling over cheese.
- Jam – my usual go-to is a fig marmalade, but raspberry works nicely too.
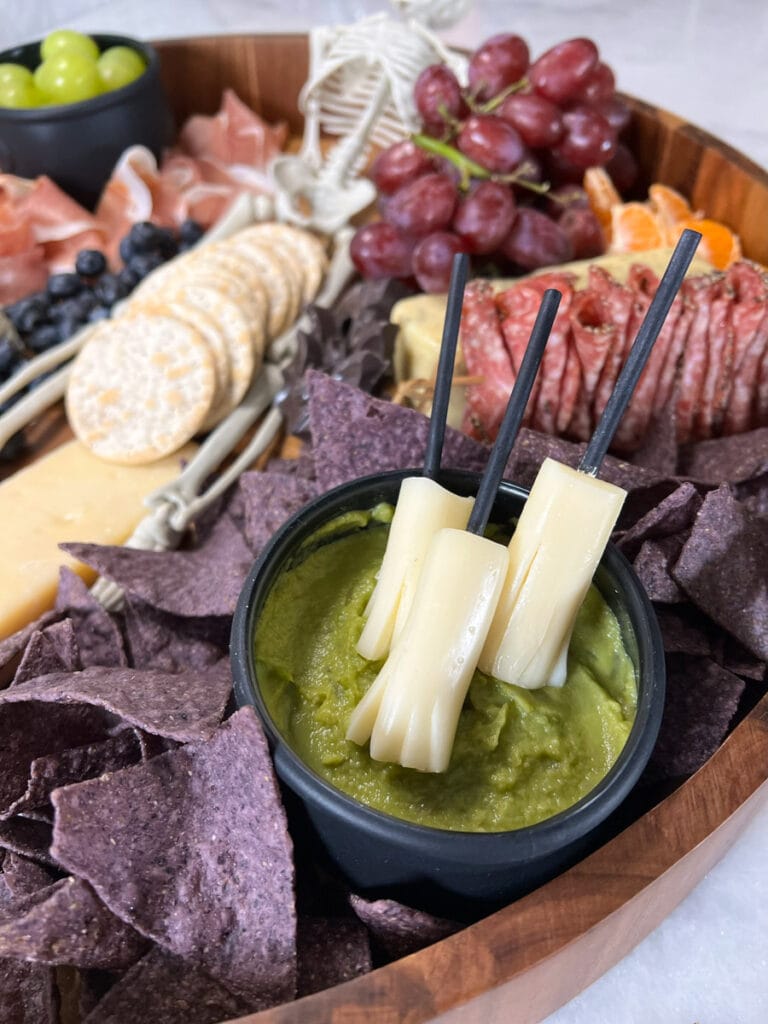
- Guacamole – this is not necessarily a traditional element, but I thought the bright green looked creepy for Halloween, especially when paired with the blue corn chips!
5. Fruit
Fruit is a great addition to any charcuterie board, and it’s also perfect for incorporating a pop of color. Choose a variety of fruits such as:
- Fresh berries – strawberries, blueberries, raspberries, or blackberries.
- Grapes – I like using both red and green grapes because they add nice contrasting colors, and both worked for a Halloween theme.
- Apple slices – you can use either green or red, as both pair well with cheese and cured meats. For my skeleton charcuterie, I went with green to play off of the grapes and the guac.
- Dried fruits – apricots, cranberries, or figs add a nice sweetness to balance out the salty elements of the board.
6. Crackers or bread
Of course, what is a charcuterie board without something to put all those delicious toppings on? Choose a variety of crackers and bread to add different textures and flavors to your board. Some options include:
- Crackers – water crackers, whole wheat crackers, or flavored crackers such as rosemary or olive.
- Bread – sliced baguette, crostini, or pita bread are all great choices. You can even make a spooky Halloween-themed toast out of white bread by using cookie cutters to cut them into a ghost shape. Just make sure to cut before you toast so it doesn’t crumble apart.
- Chips – again, not necessarily a typical choice, but for a Halloween charcuterie, I love the look of these blue corn chips! They added a nice crunch and were perfect for scooping up the guacamole.
7. Savory items
Nuts are another must-have on any charcuterie board. They add a delicious crunch and savory element to balance out the sweetness of fruits and dips. Some great options include:
- Almonds – raw or roasted, they are always a hit!
- Cashews – another popular choice, especially for their creamy texture.
- Pecans – roasted or candied pecans add a nice touch of sweetness to your board.
- Walnuts – somehow, these nuts look the spookiest to me, so a great option!
I also love having olives on my board (and the green and black colors would be great for Halloween!)
8. Chocolate or candy
For a special Halloween touch, consider adding some chocolate or candy elements to your board. This can be in the form of:
- Chocolate bars – break them into bite-sized pieces and arrange them on the board.
- Halloween candy – realistic-looking gummy worms, licorice, candy corn, or even Halloween-themed candies like candy pumpkins or candy eyeballs can add some fun and color to your board.
- Candy melts – in the photos, you can see the bats and ghosts I made by using candy melts and silicone molds. It was surprisingly easy and SUCH a hit with my daughter!
9. Spooky elements
To take your Halloween charcuterie board to the next level, add some spooky elements! This can be done in a variety of ways, such as:
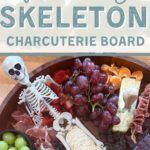
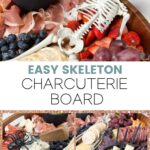
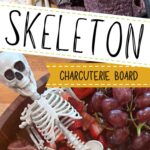
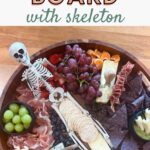
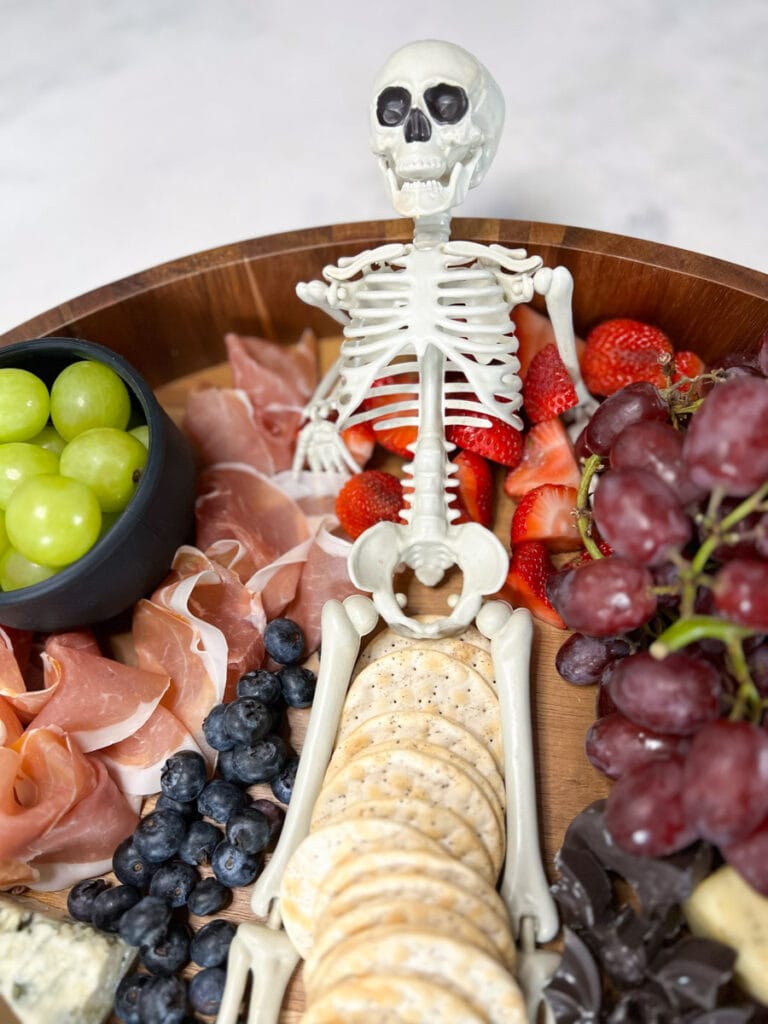
- Skeleton – I decided to make a skeleton charcuterie board, and this was a very easy way to do it! You could also layer in skeleton hands and/or skulls for a different spin.
- Halloween-themed toothpicks – these are great for skewering fruits and meats.
- Plastic spiders – add them to the board for a creepy touch.
- Edible eyes – a few of these placed strategically around the board add a nice spook factor.
- Food-safe cauldron – these act as small bowls that are perfect for dips, fruit, olives, or nuts.
- Witch brooms – cut a string cheese in half, then cut the bottom of each piece to look like a broom. Finish it off by sticking the cheese on a black lollipop stick.
10. Cheese knives + mini spoons
Don’t forget to provide your guests with the proper utensils for serving and enjoying their charcuterie! I have owned and used these cheese knives for years and love them. You can also grab a set of charcuterie board accessories to keep on hand.
Of course, you’ll also want to provide plates and napkins to your guests for mess-free eating.
Put it all together
Now that you have all your ingredients, it’s time to start assembling! Here are some tips to help you create a visually appealing Halloween charcuterie board:
- Start with the larger items first – place your skeleton on the board first, then add the blocks of cheese and the bowls or cauldrons.
- Arrange items in a pattern or grouping – this can be done by alternating items or creating small clusters of similar items. Think of your board as something that will likely be accessed on multiple sides. Make sure people coming from each side can easily access cheese, meat, and dips.
- Fill in gaps with smaller elements – don’t leave any empty space on your board. This is definitely a case of more is more! Any empty space can be filled with candy or fruit.
Tips + Tricks
- Plan ahead – make a list of the items you want to include on your board and purchase them in advance. This will save you time and stress on the day of your event.
- Choose a color scheme – I decided to lean in on green for this board, so I added green grapes, apples, and guac.
- Vary textures – mix up your meats, cheeses, fruits, and nuts to add visual interest.
- Prep ingredients beforehand – wash and cut fruits, slice meats and cheeses, and portion out nuts before assembling your board. This will make the process go much smoother and ensure that everything looks neat and tidy.
- Have fun! – charcuterie boards are meant to be enjoyed and shared with friends and family. Don’t stress too much about making it perfect. Have fun with the process, and let your creativity shine through.
Storage
Any leftover meats, cheeses, and fruits can be stored in an airtight container in the fridge for a few days.
Unless I use it right away, I typically toss any dips like jelly or honey since it’s likely been contaminated with cheese and meat.
Nuts and olives can be stored in containers and eaten over the next few days.
Fruit has a shorter shelf life, but if you squeeze some lemon on it, you can extend it by a day or two!
Leftover tip: Make grilled cheese!
My favorite way to use leftovers is to make grilled cheese. Simply gather up all the leftover cheese and meat and layer them on bread make fancy grilled cheese sandwiches.
We often incorporate other elements too like apple slices or use the leftover jam to dip sandwiches into.
It’s a hit with the entire family!
FAQs about Halloween charcuterie
Conclusion
Now that you have all the tips and tricks for creating a Halloween charcuterie board, it’s time to put them into practice. You can use this guide as inspiration and customize your board to fit your own taste preferences and dietary restrictions.
Happy snacking! 🙂

More spooky snacks to make
Want a few more Halloween ideas to try? Here are a few of my favorites:
- Candy Charcuterie Board – in the mood for sweets? This candy board is perfect for Halloween and sure to satisfy any sweet tooth!
- Easy Dipped Pretzel Rods – these rods are so much fun and would be another awesome element to add to your Halloween charcuterie!
- Halloween Rice Krispie Treats – I loved making these rice krispies with my kids. I used a store-bought rice krispie as a base to save time and just enjoyed decorating them.
- Gin and Ginger Cocktail – looking for a yummy alternative to wine to enjoy with your board? Try this easy cocktail!
Equipment
Ingredients
Cheese
- Soft cheese brie, blue cheese, mozzarella balls, or goat cheese
- Firm cheese cheddar, gruyere, or manchego
- Semi-soft cheese gouda, havarti, and fontina are all excellent choices.
Savory items
- Cured meat salami, prosciutto, or pepperoni
- Nuts walnuts, cashews, or almonds
- Olives
- Crackers and/or bread
Sweet items
- Dip jam, honey, or guacamole (for a pop of festive green)
- Fruit grapes, apples, oranges, berries
- Candy gummy worms, candy corn, chocolate
Instructions
- Start by placing your skeleton on the board (if using).
- Add the cheese. Try to evenly space them around the board so they are accessible from all sides.
- Place the dip and any other small bowls you are using (for nuts, guacamole, olives, etc).
- Layer in the meat and crackers.
- Fill any remaining spaces with fruit and chocolate or candy.
- Add any other spooky touches like plastic spiders along with your cheese knives. Serve and enjoy!
Notes
- Halloween-themed elements like skeletons, skulls, or spiders.
- Use black serving dishes or plates.
- Adding creepy food names with labels or chalkboards.
- Use dark or vibrant-colored fruits like blackberries or pomegranates.
- Add Halloween-themed toothpicks or skewers.
- Layer in a couple of creepy candies like gummy eyeballs or realistic-looking gummy earthworms.


These are must-have elements for the ultimate Halloween charcuterie!