How to Install a Floating Mantle
This post may contain affiliate links. As an Amazon Associate I earn from qualifying purchases.


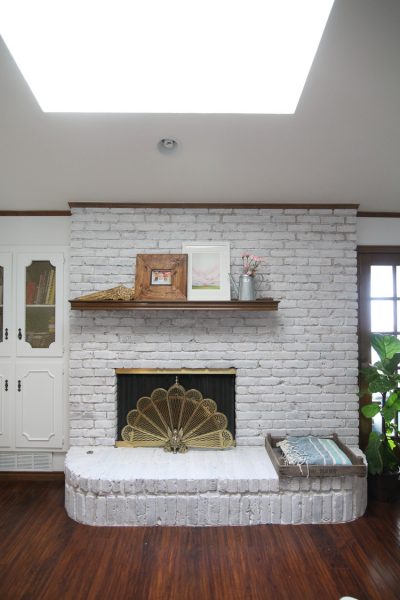
I love the look of a floating mantel! I knew I wanted to do a floating mantel DIY, but when I sat down to figure out how to install a wood beam as a fireplace mantle, I was a little stumped. There weren’t really any tutorials that I found online showing how to attach a mantel to a brick fireplace, so I had to figure it out on my own. Luckily, it was fairly easy!

How to Install a Floating Mantel – The Easy Way!
So, full confession – I had to call my dad for help on this one. Fireplace mantel installation was a little above my skillset. 🙂 My dad was kind enough to come to help Scott hang the wood mantle while I snuck out with my mom. Ironically, even though our entire house is in some sort of remodeling state or another, I told them that the wooden mantle was my number one request. Glad to report that it’s worth it! Here’s how to install a floating mantel!
Supplies Needed to Install a Floating Mantel
This post contains affiliate links.
- Wood beam (we got ours at a local home salvage store)
- Skilsaw to cut beam length to size if needed
- Drill (we used the Dewalt cordless drill)
- Masonry drill bits
- Lag bolts & shields set – I recommend 2″ long at least
- Liquid nails and caulking gun
- White caulk and caulking gun
- Long level
How to Install a Floating Mantel – Directions
Once you have your supplies gathered, it’s time to get your floating mantel DIY on. Let’s do this! Keep in mind, this tutorial is specifically for how to install a floating mantel on a brick fireplace, but the techniques could be used for another type if you alter the directions.
How to Install a Floating Mantel – Step One
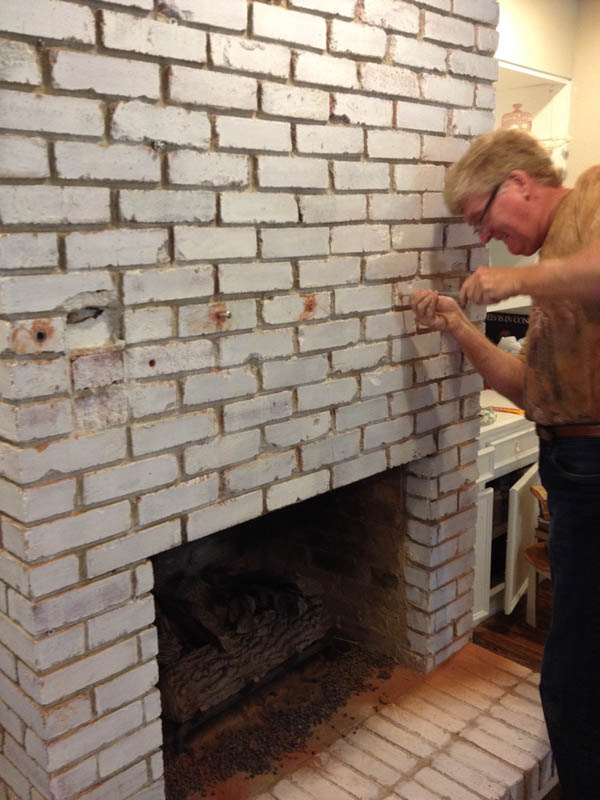
Start by removing the old wooden mantle. If you are lucky (?) and have an old house like us, it will be really easy to do. A few swings of a sledgehammer and the wood mantle was gone. See ya later!
How to Install a Floating Mantel – Step Two
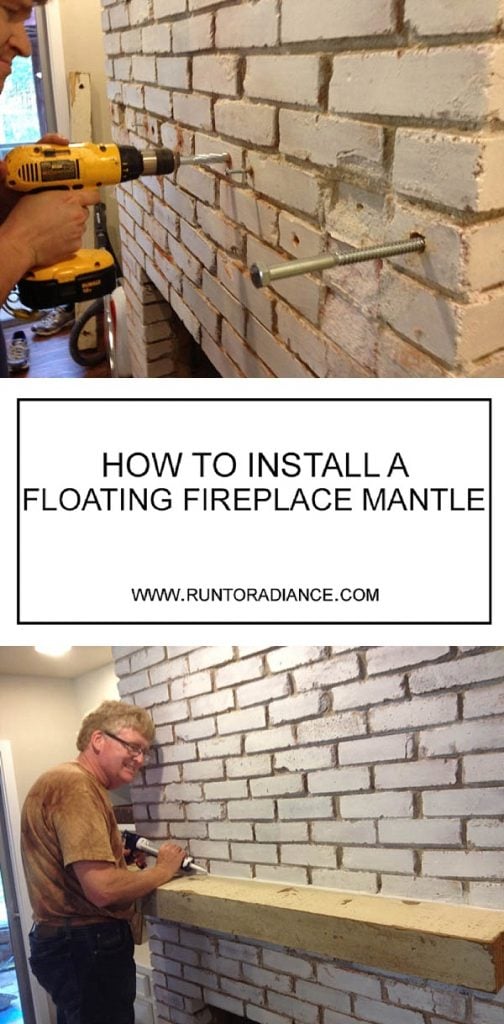
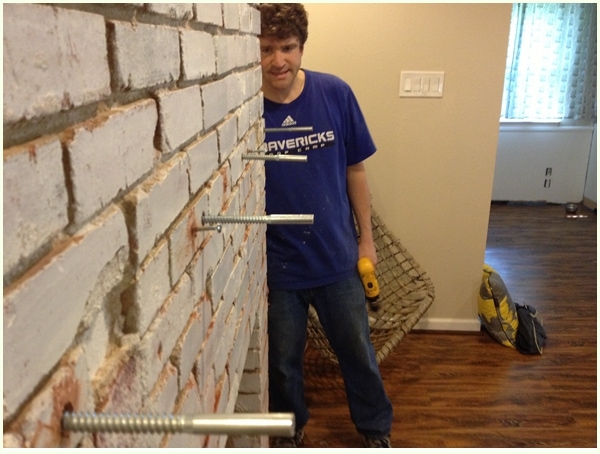
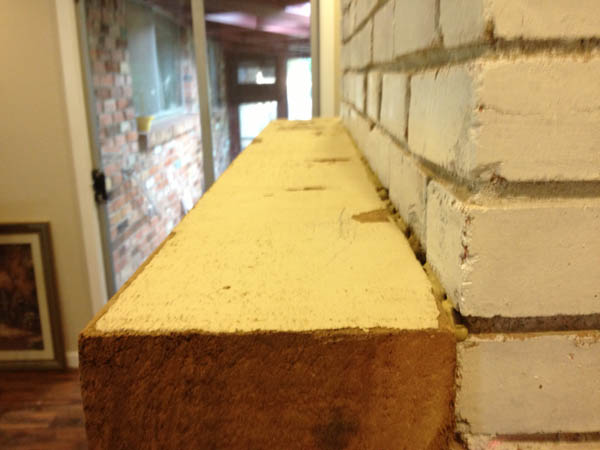
Once you have the old mantel off, it’s time to add the new one! This step will depend on how your old mantel was hung. Since there were already holes at the far ends from where the old mantle had been hung before, they decided to use those holes and measure out additional holes across the stretch where the new wooden mantle would be. They predrilled 2″ long holes into the brick, using the 5/16 masonry drill bit, then pushed lag shields into the holes.
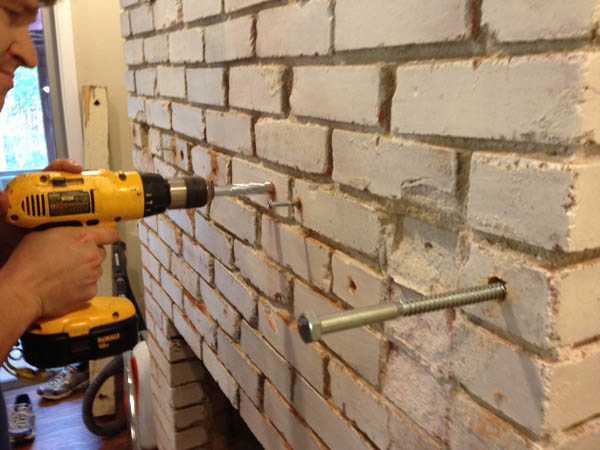
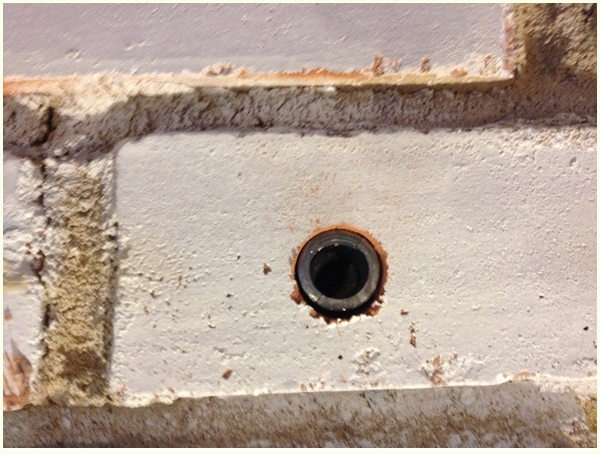
Ever wonder what a lag bolt is used for? Yeah, me either. But they are crucial for fireplace mantel installation. The Lag shields were also important to have because once they are placed in the predrilled hole, a lag bolt is able to slip inside of them and be tightened, ensuring that they won’t fall out when a heavy wood mantel is installed on it. The lag shield itself looks like this when installing:
They ended up installing 5 lag bolts all together to ensure the weight was evenly distributed. The more the merrier in this case!
How to Install a Floating Mantel – Step Three
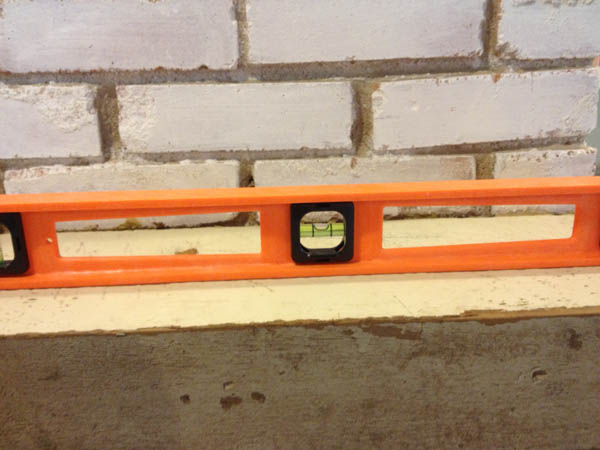
Once your lag bolts are in place, it’s time to prep your wood mantle for installation. Now it’s time to measure and drill holes into the back of the mantle so they match up with the brick bolts. Measure VERY carefully—you want the lag bolts from the brick and the holes in the wooden mantle to be lined up perfectly so the mantle can just slide into place.
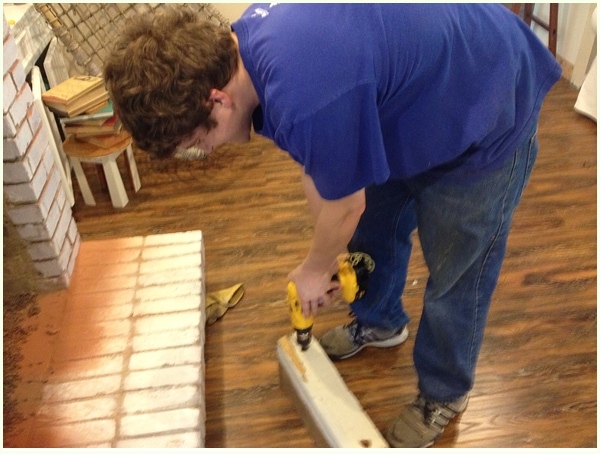
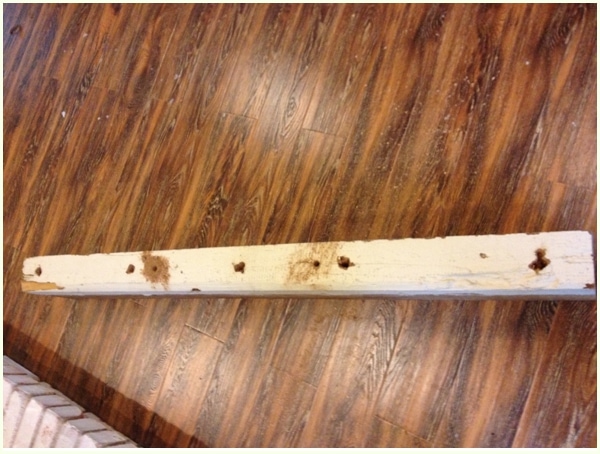
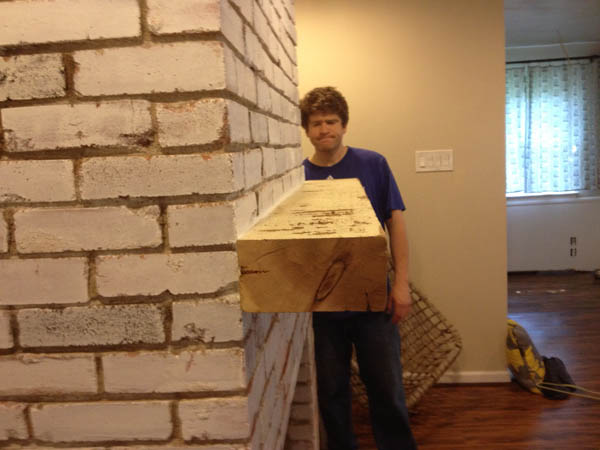
Of course, they measured perfectly and the brick bolts matched right up! The holes were super tight (which is good) so they ended up spending about 20 minutes or so getting the mantle pushed in.
My dad had the super smart idea of getting a piece of scrap wood (surprise there’s a pile in like every room of our house!) and holding it against the mantle and hitting it with a sledgehammer. They would hammer one side about an inch in, then the other, then the middle, then back to the other side and so on until it was almost all the way pushed in.
Since they were hammering the scrap wood, not the mantle, there was no damage at all.
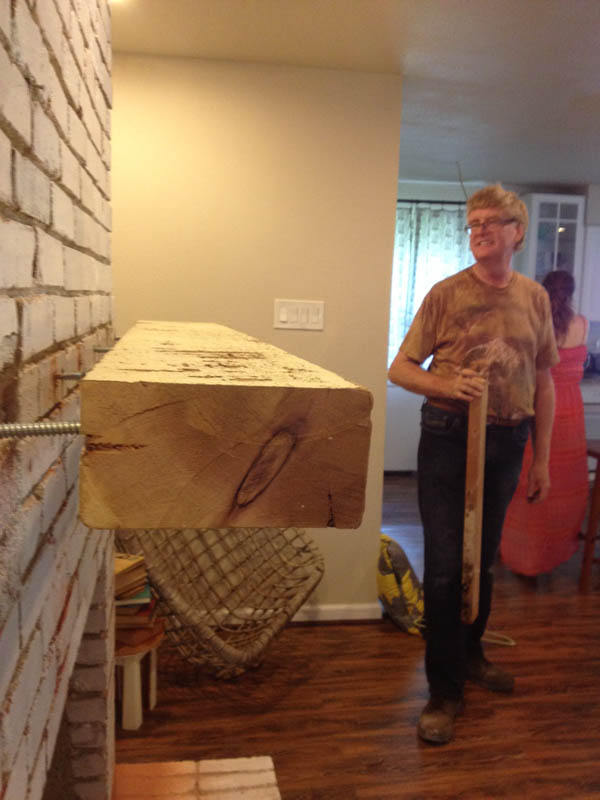
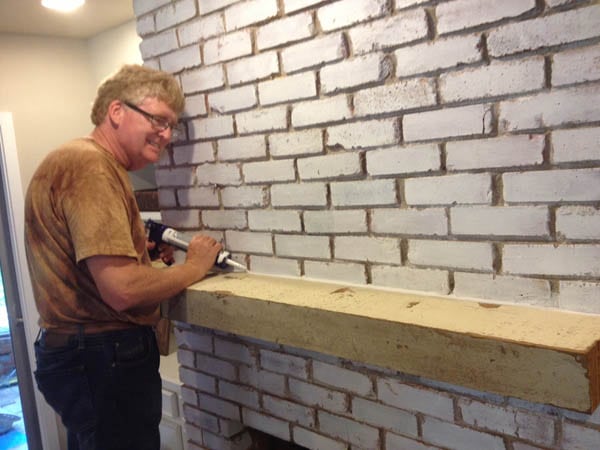
They also used liquid nails in the holes the bolts were going into so there was extra insurance that it would stay put. Scott said they used an entire bottle on those five holes! That mantle is not going anywhere!!!
Of course, they made sure it was perfectly level before, during and after installation! 🙂
Once it was proven level and super sturdy (trust me, that floating mantle isn’t going anywhere!) dad finished off the seal with white caulk so the seam would be pretty (my words not his :P).
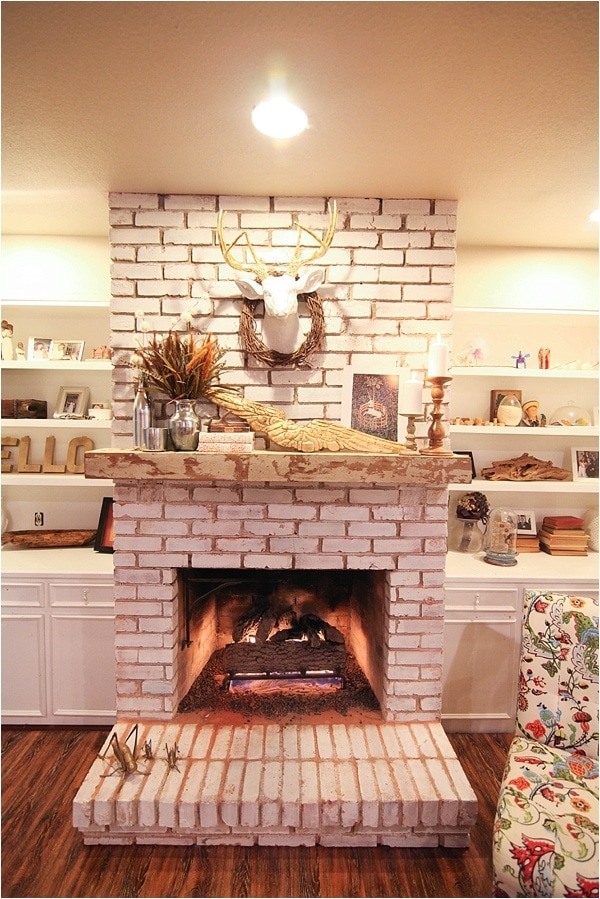
Then there was pondering and admiring the beauty of the beam turned mantle. Scott was serious and manly. I, on the other hand, might have kissed it secretly. I definitely did some happy dances. And decorated that floating mantle as soon as I possibly could!
Frequently Asked Questions About This Project
I’ve gotten a ton of questions about this project in my inbox, so I’m updating this post to address them all in one place. If you have another question that isn’t answered below, leave it in the comments and I’ll get back to you.
How to Install a Heavy Wood Mantel?
Your brick or stone fireplace is more than capable of holding the weight of a heavy wood mantel. Here are a few additional tips to help you install a heavy wood mantel:
- Use lag bolts in conjunction with lag shields that are at least 2″ long
- Add more support by increasing the amount of lag bolts. A good rule of thumb is one bolt every 10 inches.
- Buy the proper tools. You will need a drill, masonry bit, lag bolts and wood glue.
How to Install a Mantel
Every single step on how to install a floating fireplace mantle is laid out in this post. To sum it up, here are the quick steps to take if you are trying to figure out how to install a mantel:
- Remove the old mantel
- Add support by drilling holes for lag shields, then install lag bolts into the brick
- Measure carefully and drill corresponding holes for the wood mantel
- Push the wooden mantel carefully into place using wood glue for extra support
- Caulk the seam and allow time to dry before using
How Tall is a Fireplace Mantel?
54” above the hearth is the standard height for a fireplace mantel, but how high you hang a fireplace mantel will vary depending on your fireplace and your personal preferences.
How Do You Float a Fireplace Mantel?
The best way I know how to do it is to use lag bolts and lag shields drilled both into the brick fireplace and the wooden mantel. See above. 🙂
(Special thanks to my dad and Scott for their hard work and for all the photos!)
Like this post? Then you’ll love these!
How to whitewash a brick fireplace – easy 1 hour project!

How to paint a piano using chalk paint – easy 1 hour project!


I love the mantle! So gorgeous! Ours is very fussy traditional, and I’d love to have more of a wood-beam look!
Thank you Brynne! It is definitely fun to see things finally coming together 🙂
Where did you find the beam to use for the mantle? We just moved into our first home and have a brick fireplace very similar to yours. There are bricks sticking out like they intended to put in a mantle and never did! It is driving me crazy! But what is driving me even more crazy is how little information I can find on installing a floating mantle on a brick fireplace, and more importantly, how to build the box, or where to buy the beam. Grrrrrrr. Your fireplace turned out GORGEOUS!
Wayfair has a large affordable fireplace mantle selection. I had mine in 3 days.
Thank you Tania for your step by step instruction.My wife and I bought our first gone this year, and have done some minor cosmetic changes to it since.
Ours did not have a mantle and with Christmas around the corner, we wanted one for our first Christmas in our first home.
The hardest part was boring the holes in the brick, and keeping it level., but once we got that part, the rest came together and it looks great.
I picked up a great piece of old barn wood (3x6x44) from a local reclaimed wood store near me in Portland OR. I used your dads idea of using a spare wood block to hammer it into place.
Thank you again for sharing. This post was very helpful for mounting a floating mantle.
This is exactly what I was looking for! I want to install the same type of mantel, I just got done whitewashing my brick fireplace and it looks awesome, now time for the floating mantel! This is exactly what I want. This is a silly question, but where did you get the mantel itself? Did you just buy from a lumbar yard? I’m thinking if just buying a piece of wood from Menards and staining it, then doing this. Any suggestions for the type of wood? Thanks for this awesome post!
Also, what are the measurements of your mantel? Depth and height…
Hi to every body, it’s my first pay a quick visit of this weblog;
this website consists of remarkable and in fact excellent stuff in support of readers.
Just as the shorter days in autumn signify the time to gain more feathers or fur,
the spring brings a longer daylight period, and the shedding of feathers or fur
to prepare for the warmer months of spring and summer.
It sounds rather extreme and harsh, but it’s effective in absorbing
the remaining poison inside your dog. If you’re a bit busy,
go for canine food that is easy-to-prepare and follows the same principles as homemade meals like Sojos food
( products.
I have an apple iphone for function that I carry with me as almost all
office calls are transferred to this.
Format it wisely and seek assistance if you are unable to do
it yourself. Matt Henderson, owner of My – Online – Success, is an affiliate
internet marketing coach. Hiring people for sales
positions within your local business can be costly and sometime ineffective.
The mantel looks great and I love that wood with the brick. You’re so lucky to have your dad near, able and willing to help with the project!
Innovation is just not for amateurs and most meaningful developments are usually not accidents.
Some supplements mix totally different nutritional vitamins or herbs, or embrace hidden ingredients,
usually labeling them as simply energy boosters,” fat-burning products,” or weight-loss
supplements.” The combination of some of these elements may
cause vital liver injury.
The mantle came out great!!! The house I will be moving into has a fireplace without a mantle, so I will definitely be referring to your post!
I’d love it for you to share this on my weekly link party, it goes live tomorrow at 6PM:)
http://www.twentysomethinginthe2010s.com/category/peace-love-link-up/
You should seriously blog daily. This is awesome. Hell, blog twice a day. I love reading this kind of content.
Underground bunkers are advantageous for a number
of causes; they provide the added safety of being under the surface thus escaping a significant portion of the
consequences from blasts and radiation, they can be pre-stocked with provisions to maintain their occupants
for a number of months and, most essential, they are often positioned connected to, or adjacent to, a shopper’s primary
residence, thus allowing for fast evacuation.
Hey there! This is an awesome blog and it looks fantastic! I picked up my beam from a wood shop last week and am preparing to install in brick! I’m very excited but nervous. I’m going to put a lot of questions, I hope you don’t mind 🙂 Were you guys worried at all about not hitting any studs? I know you got the 2″ shields, but how long of lag bolts did you use? How far did you screw them into the brick? Just 2″? How did you use the leveler if your bolts were already drilled? How could you have fixed it if there was a problem? Thank you so much!
I think everything posted was actually very reasonable.
However, what about this? suppose you added a little content?
I mean, I don’t want to tell you how to run your blog, however what if you
added a post title that makes people desire more? I mean How to Install a Floating Mantle – Step by Step Instructions is kinda plain. You
ought to look at Yahoo’s home page and watch how they create article headlines to grab viewers
interested. You might add a related video or a picture or two to get readers excited
about everything’ve written. Just my opinion, it could bring your
posts a little livelier.
The share box covers part of the instructions! Makes the whole post kind of useless.
Turned out great. The one thing it looks like you did but I didnt see in the directions is that you cut the heads off the lag bolts once you tightened them. I figured it out eventually, but after I looked like an idiot looking and asking for lag bolts without a head at the hardware store for like 1 minutes 🙂 . Good work on the content and execution, every other post I saw was how to build one 1×6’s around a small interior frame. I like the solid post.
Exactly… I was thinking that the heads had to be removed for this to work..
But, yes, great information!
I’ve got a bean from a house built in 1890 or so.
Gonna burn it shosugiban style, sand it a bit, and stain it.
But I know the mounting done properly is key.. I’ll be working with a 100 plus pound beam.
Interesting, and the end result looks very nice, but I would not attempt to mount it using the procedure described because drilling the bricks first, and then having to measure the mantel hole locations VERY accurately (as the article mentions) almost certainly means that with 5 bolts something will be skewed and won’t easily align.
What I would do: drill the first hole (say the rightmost one) into the brickwork as described, and insert its bolt. Then in the new mantel piece, locate and drill all 5 holes. Then with the help of an assistant insert the mantelpiece onto the single bolt and with a level placed on top, swing it into a horizontal position. Then, drill the remaining 4 holes into the brickwork using the mantelpiece as the template, Does away with all the extra measuring and the holes in the wood and brick will align.
Did you cut off the end of the lag bolts that go into the beam?
LOVE YOUR MANTEL ,,,I HAVE A HINT THAT WORKS FOR ME WHEN MEASURING HOLES LIKE THAT . AFTER YOU INSTALL THE LOG SHIELD BOLT HOLDER HOLES . RUN A WIDE PIECE OF MASKING TAPE OVER THE LENGTH OF THE HOLES AND MARK EACH HOLE . PULL OFF THE MASKING TAPE AND PLACE IT ON THE NEW MANTLE BEAM CAREFULLY MARKING WHERE EACH HOLE WILL BE DRILLED
A PERFECT MATCH ,, EASY WAY FOR PEOPLE LIKE ME POOR MEASURERS
DId you set up the light directly above the mantle as well?
It looks like you cut the heads off the lag bolts but didn’t mention it in the writeup.
I reviewed your posting and found it very useful. I’m currently building a mantel for one of my neighbors. The original mantel floated away during Katrina. Yes, that’s what my neighbor told me it floated away. That’s beside the point. I came across some large Southern Live Oak and going to make the supports and mantel out of Southern Live Oak. The dimensions of the mantel are; 80 inches long x 11 inches wide x 4 inches thick. Yes, it is a very heavy mantel. The supports I’m making is for style also the original supports are still in place but will be removing them. I wish I could upload the images. If anyone is interested in having Southern Live Oak as a mantel, please contact me ([email protected])
Hello,
How did you remove the hexagon end of the lag bolt?
Hi! What size lag bolts did you use and what size drill bit for the holes on the mantel otself?
The mantel look amazing, thanks for sharing.
What about a brick VENEER fireplace? I worry that all that hammering involved would jar loose the mortar behind the bricks.😳
I was looking at this to find out how they are attached, it would be nice if you guys recommended drilling angular holes instead of using liquid nails, I have a creosote soaked railroad tie giving off carcinogenic fumes hanging over my fireplace that is causing massive issues removing because of situations like this.
Sorry to hear that! I can’t speak for how your fireplace mantle is installed, only my own. You can try a glue remover, which is supposed to work great with liquid nails (if that’s what they used).
Your mantel is exactly what I want to do except I don’t have predrilled holes to use. Do you know if it will make a difference where I drill the holes, into the actual brick or into the mortar?
Thank You
Hi Shawn! Definitely drill into the brick – it will hold the weight better. Make sure you use a masonry bit to drill. Good luck!