How to Paint a Chevron wall
Did everyone have an amazing weekend?!?! I have a confession…
So I sort of kept a secret from you all in my last post about my green door.
The real reason I’m not loving it as much as I did is this guy:
![]()
Yes, my chevron entry way wall that I painted. It is the first thing you see when you walk in the door and I sort of feel like it competes/clashes too much with the green door. But- let me start at the beginning.
So, after the door was green we had this blank wall that we added during our remodel. Somehow I never got a picture of the wall we added or what it looked like before- but basically when you walked in the front door you could turn right (into the dining room) or go straight and walk down a 10 foot hallways that had a coat closet and eventually hit the main hallway to the bedrooms. Since we knew we wanted to expand the bathroom in the master- we decided to build a wall and use that random hallway (plus the coat closet in it) as part of our expansion. (For now it’s where all the stacks of boxes of wood floor sits until we finalize the new floor plan!) This is the closest picture I got to the old entry way- see the lovely wallpaper and lighting 😉 You can almost make out the old opening (where the wall is now) on the bottom right hand side.
![]()
The wall is literally 5 feet in front of your face when you come in, and I knew I wanted to do something fun on that wall (since the rest of our paint is so neutral). After I saw this post at Young House Love, I knew what I wanted to do. A chevron wall! How trendy of me! 🙂
I thought it would be pretty easy. I saw tutorials floating around the internet and wondered why anyone would need to consult a tutorial. How hard could it be?
Hard, actually. So here’s my tutorial 🙂
![]()
It was about 9pm on a Friday night when I decided to tackle this project (it was a good way of getting out of helping Scott paint the ceiling with a 4th coat of paint. Boo that!).
Then I stopped…wait…how would I do this?
I had already painted the walls and ceiling in the entry way Benjamin Moore’s Steel Wool in anticipation of adding the Chevron pattern on top in BM Edgecomb Gray. The dining room chalkboard wall is in Steel Wool, and the rest of the dining/living/kitchen/ceilings in the room in Edgecomb Gray, so I thought it’d be a great way to tie everything all together. I was right on that but mistake number one was I should’ve painted that wall Edgecomb Gray (the lighter color) and painted the darker color on top of that. Ooops. It worked still, just took more coats.
My first plan of action, as always, was to draw what I wanted so I knew how many stripes to add:
![]()
Then I had Scott help me measure the wall and I drew chalk lines every 8″ which would leave me with 5 chevron lines in the end.
![]()
Then, I carefully did my first “chevron” with painters tape. I could’ve measured it….but I didn’t feel like it. So I just did my best to make it even and be careful.
![]()
The first line took the longest and after that I followed the same pattern.
![]()
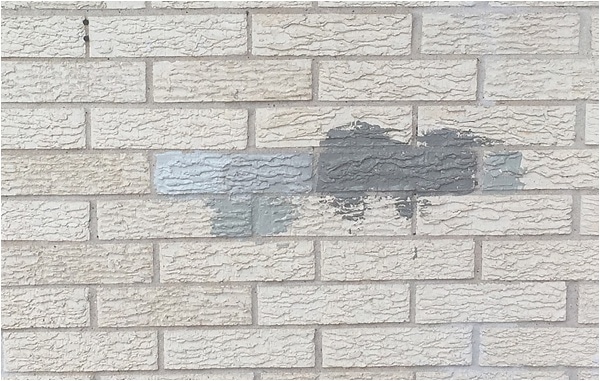
It took me 3 coats of Edgecomb Gray to get enough coverage…and to be honest at first I hated it. I thought it looked terrible, like some bad 70’s dress.
![]()
Plan B was to paint over it all in Steel Wool and chalk it up to 5 hours of my life wasted….but I decided to see what it looked like with the tape removed and all of a sudden (angels singing) I loved it.
![]()
Really loved it.
It’s definitely not perfect, but it’s perfect enough and I only had to use math one time. Win/win.
I have huge plans to make the wall even cooler by adding art, mirrors and possibly even a tiny consul table. We’ll see!
![]()
So…in the end, this is why the front door Green-ness is bugging me. There can only be one star in our entry way….and Mr. Sexy Chevron is the winner. Sorry green door 🙁
![]()
What do you all think? Do you all plan for the overall “vibe” of your house? Or just do what you love and fergettaboutit?

Tania Griffis is an accomplished writer, blogger, and interior designer with a Journalism degree from the University of Oklahoma. She started her popular blog, Run to Radiance, in 2011, demonstrating her design expertise through the personal remodeling of six houses to millions of readers across the globe.
Tania also owns The Creative Wheelhouse, a respected ghostwriting agency for bloggers, further showcasing her talent for creating engaging and informative content.
I love it Tania!!! Now invite us over so we can come see it!! 🙂
Thanks Kasey! 🙂 You got it girl. Let’s figure out a time on Sunday!
I love the green and chevron together! So cute!
Thanks Lydia…it’s starting to grow on me 🙂 For now it’s staying!
I LOVE the chevron and green door together! I am now trying to think of a place in my house I can paint one too!
Quick question about doors… I have a wooden door that’s been painted a few times and it chipping (wood and all) In your expert opinion, would you recommend painting over it or sanding it down and redoing the whole thing? I’m worried if I sand it down I’ll need to remove the door. (no bueno in Texas!)
Hi Amber! Thanks for stopping by! 🙂 There’s always room for some green and chevron, right? 😉 Let me know if you decide to do it and where!! As far as your do goes I would recommend sanding it- starting with a course sand paper and moving to a fine grit one. Unfortunately you’ll probably have to sand the entire door rather then just the chipping spots because the paint may not end up uniform. Once you have it sanded, dust it really well and then do a coat of primer then paint- just make sure you are using exterior paint. I did all our sanding and painting with our door still on the hinges- I just removed the door knob and locks because it was easier then taping it off for me! 🙂 Good luck!
This is a great idea! Thanks for sharing. Hi, I’m Anita visiting from Link Party Palooza.